Displaying the Point Cloud
Finding Third-Party Plugins for Bevy
With its plugin architecture, Bevy is easily extendable by anyone. And with everything based on the ECS, any Bevy user can become a plugin author or an engine developer. This flexibility allows for a wide range of customization and integration options.
The Bevy community is very active to publish new plugins. You can find them:
- On the website, the Asset page
- On Discord, the #crates channel
Third-Party Plugin for Point Clouds
Bevy doesn't support rendering point clouds out of the box, but a user recently created a plugin bevy_pointcloud, with a Wasm demo.
Point Clouds
Some sample point clouds are available at https://www.limon.eu/support/sample-data.
In this workshop, we will use the KITTI dataset, made for training object detection models. It's available at https://www.cvlibs.net/datasets/kitti/raw_data.php.
If your phone has a LiDAR, you can capture a point cloud with it.
Other techniques to build a point cloud are:
- Time of flight
- Stereo vision
- Structure from motion
- Machine learning based monocular depth estimation
- Structured light
- Photogrammetry
But they are harder to setup, less accurate, or require more processing power.
First Step
Let's display a small point cloud, to check how it looks.
To use bevy_pointcloud, we need to:
- Add the
PointCloudPluginplugin - Add the
LasLoaderPluginplugin - Configure the
Camera3dto not use Indirect Drawing, and no MSAA, with theNoIndirectDrawingandMsaacomponents - Configure the
Camera3dto render point clouds, with thePointCloudRenderModecomponent - Spawn the point cloud, with the
PointCloud3dandPointCloudMaterial3dcomponents
extern crate bevy;
extern crate bevy_pointcloud;
use bevy::{prelude::*, render::view::NoIndirectDrawing};
use bevy_pointcloud::{
    PointCloudPlugin,
    loader::las::LasLoaderPlugin,
    point_cloud::PointCloud3d,
    point_cloud_material::{PointCloudMaterial, PointCloudMaterial3d},
    render::PointCloudRenderMode,
};
fn main() {
    App::new()
        .add_plugins((
            DefaultPlugins,
            PointCloudPlugin,
            LasLoaderPlugin,
        ))
        .add_systems(Startup, setup)
        .run();
}

fn setup(
    mut commands: Commands,
    asset_server: Res<AssetServer>,
    mut point_cloud_materials: ResMut<Assets<PointCloudMaterial>>,
) {
    commands.spawn((
        Camera3d::default(),
        Transform::default(),
        Camera::default(),
        NoIndirectDrawing,
        Msaa::Off,
        PointCloudRenderMode::default(),
    ));

    commands.spawn((
        PointCloud3d(asset_server.load("sample-pointclouds/lion_takanawa.copc.laz")),
        PointCloudMaterial3d(point_cloud_materials.add(PointCloudMaterial { point_size: 50.0 })),
    ));
}
The default camera is not very useful. We can either use a fly camera controller (like the one provided in Bevy examples) or a Pan/Orbit camera controller.
About KITTI
KITTI was recorded in Germany in 2011 with a car with cameras and a LiDAR:
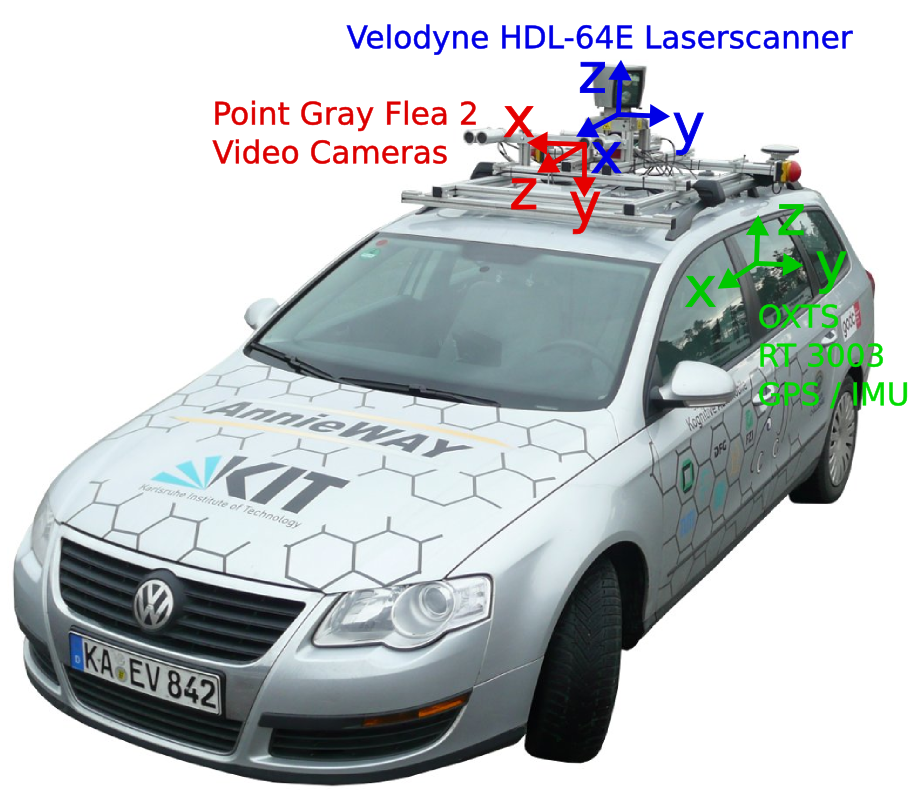
Recording are made of several frames, each with a point cloud and photos.
One recording is made available in an easy to use format in the repo, more are available at https://drive.google.com/file/d/1BDvaCX2748OcW7aPPngLRmZqTk4ms_ee/view?usp=share_link.
It doesn't have color but instead intensity, the return strength of the laser. I've converted this information to color, blue for low intensity, green for high.
It is common when rendering point clouds to be able to switch between different rendering modes:
- Point color
- Beam intensity
- Point height
bevy_pointcloud only supports color for now.