Welcome
Welcome to the non-game workshop for the Bevy Game Engine.
You can access it at https://vleue.github.io/bevy_workshop-eurorust-2025/.

Building interactive data visualizations in Rust can be a daunting task... Let's see how Bevy, a data-driven game engine, can help us! From building interactive dashboard to spatial and temporal data visualization, or just Computer Assisted Design, Bevy can be the solid (and fun!) foundation of your next application. This workshop will teach you Bevy basics through non game applications, and a few advanced rendering techniques, so that you're ready to tackle those challenges!
By the end of this workshop, you will have a comprehensive understanding of how Bevy works and will have tried a few usages outside of games.
Target Audience
This workshop is designed for individuals who want to deepen their understanding of Bevy basics and already have a good grasp of Rust.
To get started with Rust, explore these free resources:
- The Rust Programming Language: An introductory book about Rust
- Comprehensive Rust: A course covering the full spectrum of Rust, from basic syntax to advanced topics like generics and error handling
- Rustlings: Small exercises to familiarize you with reading and writing Rust code
- Rust Exercises: 100 exercises to learn Rust
This workshop will not use any third-party plugins and will not delve deeply into rendering.
Setup
Clone the repository
git clone https://github.com/vleue/bevy_workshop-eurorust-2025
Environment setup
- Install rust: https://rustup.rs
curl --proto '=https' --tlsv1.2 -sSf https://sh.rustup.rs | sh
-
(on linux) Install linux dependencies: https://github.com/bevyengine/bevy/blob/release-0.17.2/docs/linux_dependencies.md
-
First build of the workshop. The initial build can take some time.
cargo build
Terms
Explore key terms and concepts used in Bevy. We'll delve deeper into how they are applied throughout the workshop.
ECS
E for Entity
An Entity is a unique identifier that represents a general-purpose object in the ECS. It acts as a pointer.
C for Component
A Component is a data structure that holds information or attributes of an entity. Components are used to store the state and data of entities.
S for System
A System is a function that operates on entities with specific components. Systems define the behavior and logic of the ECS by processing entities' components.
Another way to think about ECS
It's a database!
Entities are the index, components are the columns and systems are procedural queries.
Bevy Concepts
Application
The Application is the main entry point of Bevy. It manages the application loop, schedules systems, and handles resources and events. It exists only during setup, and is not available once the application loop started.
Schedule
A Schedule is a collection of Systems that are executed in a specific order. It is used to organize and control the flow of the application. The order can be specified by the user, or automatically inferred by Bevy.
Plugin
A Plugin is a modular piece of functionality that can be added to a Bevy app. It encapsulates systems, resources, and configuration. It exists only at build time.
World
The World is a data structure that stores all entities and their components. It provides methods to query and manipulate entities and components.
Query
A Query is used to access entities and their components in a World. It allows systems to filter and iterate over entities with specific component sets.
Commands
Commands are used to schedule changes to the World, such as adding or removing entities and components. They are executed later during the same frame, after the system that generated them ended.
Resource
A Resource is a globally accessible data structure that is not tied to any specific entity. It is used to store shared data and state.
Event and Observer
Events can be triggered by a system. They can be targeted at a specific entity.
Bevy will automatically trigger events for some of the World changes, like Component modifications or Entity creation.
An Observer is a System that reacts to an Event, and doesn't need to be added to a Schedule. It is executed at the earliest possible time by Bevy, and for each Event individually. It is used to implement reactive behavior.
Message
Messages can be sent between systems to communicate data or trigger actions. They are buffered.
Relations
Relations are a way to link entities together. The most common is the parent / children relation, which propagates things like position and visibility.
Introduction to Bevy
Embark on your development journey by creating a captivating splash screen. In this section, you will:
- Set up a new Bevy application
- Integrate essential plugins
- Develop a system to spawn entities with components
- Use states to minimize boilerplate code
- Refactor your codebase with plugins for better organization
- Learn about hot-patching, for faster development iteration
The Application
The initial goal is to open a window using Bevy!
Empty Application
Let's start a new project with Bevy
cargo new bevy_workshop-eurorust-2025
cd bevy_workshop-eurorust-2025
We can add Bevy 0.17 with the default features enabled:
cargo add bevy@0.17

Updating crates.io index
  Adding bevy v0.17 to dependencies
         Features as of v0.17.1:
         41 activated features
         68 deactivated features
Updating crates.io index
 Locking 468 packages to latest Rust 1.86.0 compatible versions
Bevy exposes a lot of features, 133 for the 0.17! The full list of features is available in the documentation. It is important to disable default features and only enable the ones you need. This will improve performance, compilation time and reduce binary size.
This is the most basic Bevy application. It will exit immediately upon running and perform no actions.
extern crate bevy;
use bevy::prelude::*;

fn main() {
    App::new().run();
}
Default Bevy Plugins
Default plugins are added to handle windowing, rendering, input, audio, and more. This application opens a window and then does nothing.
extern crate bevy;
use bevy::prelude::*;

fn main() {
    App::new()
        .add_plugins(DefaultPlugins)
        .run();
}
Plugins can be configured; in this example, we set a custom title for the window.
extern crate bevy;
use bevy::prelude::*;

fn main() {
    App::new()
        .add_plugins(DefaultPlugins.set(WindowPlugin {
            primary_window: Some(Window {
                title: "Bevy Workshop".into(),
                ..default()
            }),
            ..default()
        }))
        .run();
}
Systems and Schedules
A splash screen needs to display something, so let's show a title in the open window.
extern crate bevy;
use bevy::prelude::*;

fn main() {
    App::new()
        .add_plugins(DefaultPlugins.set(WindowPlugin {
            primary_window: Some(Window {
                title: "Bevy Workshop".into(),
                ..default()
            }),
            ..default()
        }))
        // add a system that executes once at startup
        .add_systems(Startup, display_title)
        .run();
}

fn display_title(mut commands: Commands) {
    commands.spawn(Camera2d);

    commands.spawn((
        Node {
            width: Val::Percent(100.0),
            height: Val::Percent(100.0),
            align_items: AlignItems::Center,
            justify_content: JustifyContent::Center,
            flex_direction: FlexDirection::Column,
            ..default()
        },
        children![
            (
                Text::new("Bevy Workshop"),
                TextFont {
                    font_size: 130.0,
                    ..default()
                },
            ),
            (
                Text::new("EuroRust 2025"),
                TextFont {
                    font_size: 100.0,
                    ..default()
                },
            )
        ],
    ));
}
Schedules
The Startup schedule is used for tasks that need to occur only once during application startup.
Other common schedules include PreUpdate, Update, and PostUpdate, along with their fixed counterparts: FixedPreUpdate, FixedUpdate, and FixedPostUpdate.
Systems in the Update schedule execute every frame. With vsync enabled, this is typically driven by your screen's refresh rate, commonly 60fps, with some Macs running at 120fps. Systems in the FixedUpdate schedule execute at a configurable, fixed frequency, defaulting to 64Hz. Most of your logic should occur within these schedules.
Pre* and Post* schedules are useful for preparation and cleanup/propagation tasks surrounding application logic.
Systems
Systems are functions whose parameters must implement the SystemParam trait. These parameters are provided through dependency injection based on their type.
If you want more details on how this works, you can find them here: Dependency Injection like Bevy Engine from Scratch
Commands
Commands are one way of modifying the application world, without risking to encounter double borrow of the world. You can add, mutate, or remove entities and components. They are not executed straight away, but at sync points between systems.
Hierarchy
Bevy has the concept of hierarchy, with Parent / Children relationship. This is heavily used in UI for layout, or in animations.
When an entity is a child of another, its position is relative to its parent. It's also possible to remove a complete branch of a hierarchy at once.
The children! macro is an helper to reduce boilerplate when spawning an entity with children. It handles automatically the Children / Parent components, and keeps the code simpler.
Side note: UI
The startup system in the example above spawns text. It first spawns a node entity, which functions similarly to a <div> HTML tag, used to center the text, and then spawns the text itself as a child.
Bevy offers two layout strategies for UI: Flexbox and CSS Grids.
Updating the World
A key characteristic of a splash screen is that it doesn't stay forever. Let's remove the title after two seconds.
extern crate bevy;
extern crate bevy_ecs;
use bevy::prelude::*;

fn main() {
    App::new()
        .add_plugins(DefaultPlugins.set(WindowPlugin {
            primary_window: Some(Window {
                title: "Bevy Workshop".into(),
                ..default()
            }),
            ..default()
        }))
        .add_systems(Startup, display_title)
        .add_systems(Update, remove_title)
        .run();
}

fn display_title(mut commands: Commands) {
    commands.spawn(Camera2d);

    commands.spawn((
        Node {
            width: Val::Percent(100.0),
            height: Val::Percent(100.0),
            align_items: AlignItems::Center,
            justify_content: JustifyContent::Center,
            flex_direction: FlexDirection::Column,
            ..default()
        },
        children![
            (
                Text::new("Bevy Workshop"),
                TextFont {
                    font_size: 130.0,
                    ..default()
                },
            ),
            (
                Text::new("EuroRust 2025"),
                TextFont {
                    font_size: 100.0,
                    ..default()
                },
            )
        ],
    ));

    commands.insert_resource(SplashScreenTimer(Timer::from_seconds(2.0, TimerMode::Once)));
}

#[derive(Resource)]
struct SplashScreenTimer(Timer);

fn remove_title(
    time: Res<Time>,
    mut timer: ResMut<SplashScreenTimer>,
    mut commands: Commands,
    nodes: Query<Entity, With<Node>>
) {
    if timer.0.tick(time.delta()).just_finished() {
        for entity in &nodes {
            commands.entity(entity).despawn();
        }
    }
}
Resources
Resources are used to store singletons in the world, based on their type.
Here, we're adding a resource SplashScreenTimer that simply holds a Timer.
Queries
Queries are used to access entities and their components in the world and can be filtered.
In the remove_title system, we're using a Query that requests access only to the Entity, filtering on the component Node, which is a basic component shared among all UI elements.
Mutable vs. Immutable Access
The remove_title system accesses two resources:
Time, provided by Bevy, in an immutable waySplashScreenTimer, our custom resource, in a mutable way; the timer in this resource will be ticked, so we need to modify it
As the world continues to hold ownership of data, systems have access to references. Only one system accessing a given part of the world mutably can run at a time. Systems that access different parts mutably, or the same parts immutably, can run in parallel.
States
Bevy provides an abstraction and helpers to control systems that execute based on the application's state, aptly named "states."
extern crate bevy;
extern crate bevy_ecs;
extern crate bevy_state;
use bevy::prelude::*;

fn main() {
    App::new()
        .add_plugins(DefaultPlugins.set(WindowPlugin {
            primary_window: Some(Window {
                title: "Bevy Workshop".into(),
                ..default()
            }),
            ..default()
        }))
        .init_state::<ApplicationState>()
        .add_systems(OnEnter(ApplicationState::Splash), display_title)
        .add_systems(Update, switch_to_menu.run_if(in_state(ApplicationState::Splash)))
        .run();
}


#[derive(Debug, Clone, Copy, Eq, PartialEq, Hash, States, Default)]
enum ApplicationState {
    #[default]
    Splash,
    Menu,
}

#[derive(Resource)]
struct SplashScreenTimer(Timer);

fn display_title(mut commands: Commands) {
    commands.spawn(Camera2d);

    commands.spawn((
        Node {
            width: Val::Percent(100.0),
            height: Val::Percent(100.0),
            align_items: AlignItems::Center,
            justify_content: JustifyContent::Center,
            flex_direction: FlexDirection::Column,
            ..default()
        },
        children![
            (
                Text::new("Bevy Workshop"),
                TextFont {
                    font_size: 130.0,
                    ..default()
                },
            ),
            (
                Text::new("EuroRust 2025"),
                TextFont {
                    font_size: 100.0,
                    ..default()
                },
            )
        ],
        DespawnOnExit(ApplicationState::Splash),
    ));

    commands.insert_resource(SplashScreenTimer(Timer::from_seconds(2.0, TimerMode::Once)));
}

fn switch_to_menu(
    mut next: ResMut<NextState<ApplicationState>>,
    mut timer: ResMut<SplashScreenTimer>,
    time: Res<Time>,
) {
    if timer.0.tick(time.delta()).just_finished() {
        next.set(ApplicationState::Menu);
    }
}
State-Based Schedules
When using states, additional schedules are available: OnEnter, OnExit, and OnTransition.
Changing States
States can be changed using the NextState resource.
State-Scoped Entities
By adding the DespawnOnExit component, all entities and their hierarchy marked with this component will be despawned when exiting the state.
Plugins
Plugins are used for code organization, often in their own files.
extern crate bevy;
extern crate bevy_ecs;
extern crate bevy_state;
use bevy::prelude::*;

fn main() {
    App::new()
        .add_plugins(DefaultPlugins.set(WindowPlugin {
            primary_window: Some(Window {
                title: "Bevy Workshop".into(),
                ..default()
            }),
            ..default()
        }))
        .init_state::<ApplicationState>()
        .add_plugins(splash::SplashPlugin)           // adding our new plugin
        .run();
}

#[derive(Debug, Clone, Copy, Eq, PartialEq, Hash, States, Default)]
enum ApplicationState {
    #[default]
    Splash,
    Menu,
}

mod splash {
    use bevy::prelude::*;

    use crate::ApplicationState;

    pub struct SplashPlugin;

    impl Plugin for SplashPlugin {
        fn build(&self, app: &mut App) {
            app.add_systems(OnEnter(ApplicationState::Splash), display_title)
                .add_systems(Update, switch_to_menu.run_if(in_state(ApplicationState::Splash)));
        }
    }

    fn display_title(mut commands: Commands) {
        commands.spawn(Camera2d);

        commands.spawn((
            Node {
                width: Val::Percent(100.0),
                height: Val::Percent(100.0),
                align_items: AlignItems::Center,
                justify_content: JustifyContent::Center,
                flex_direction: FlexDirection::Column,
                ..default()
            },
            children![
                (
                    Text::new("Bevy Workshop"),
                    TextFont {
                        font_size: 130.0,
                        ..default()
                    },
                ),
                (
                    Text::new("EuroRust 2025"),
                    TextFont {
                        font_size: 100.0,
                        ..default()
                    },
                )
            ],
            DespawnOnExit(ApplicationState::Splash),
        ));

        commands.insert_resource(SplashScreenTimer(Timer::from_seconds(2.0, TimerMode::Once)));
    }

    #[derive(Resource)]
    struct SplashScreenTimer(Timer);

    fn switch_to_menu(
        mut next: ResMut<NextState<ApplicationState>>,
        mut timer: ResMut<SplashScreenTimer>,
        time: Res<Time>,
    ) {
        if timer.0.tick(time.delta()).just_finished() {
            next.set(ApplicationState::Menu);
        }
    }
}
For most cases, a plugin can be a free function:
extern crate bevy;
extern crate bevy_state;
use bevy::prelude::*;
#[derive(Debug, Clone, Copy, Eq, PartialEq, Hash, States, Default)]
enum ApplicationState {
    #[default]
    Splash,
}
fn main() {
    App::new()
        // ...
        .add_plugins(splash::splash_plugin)           // adding our new plugin
        .run();
}

mod splash {
    use bevy::prelude::*;
    use crate::ApplicationState;
    fn display_title() {}
    fn load_assets() {}
    fn switch_to_menu() {}
    pub fn splash_plugin(app: &mut App) {
        app.add_systems(OnEnter(ApplicationState::Splash), display_title)
            .add_systems(Update, switch_to_menu.run_if(in_state(ApplicationState::Splash)));
    }
}
Start Menu
Adding a Start Menu
We'll add a new plugin to handle the start menu. It will be very similar to the splash screen plugin, with different text and with a different condition to change state.
Tips:
-
Create a new file for the new plugin, you can copy
splash.rsas a starting point -
Change the state conditions and state scopes to
ApplicationState::Menu -
Modify the text to display a start menu instead of a splash screen
-
Add buttons with the
Buttoncomponent, and make them interactive -
Add the new plugin to the application
Hot-Patching
Bevy has built-in support for hot-patching thanks to Dioxus's subsecond.
Install the Dioxus CLI
cargo install dioxus-cli@0.7.0-rc.0
Run your app through dx
dx serve --hot-patch --features "bevy/hotpatching"
Modify your code
Change anything in a system that runs in the Update schedule.
Current limitations and workarounds
- Only works for code in the binary crate being run.
- Not supported in Wasm.
- Can't change system parameters.
- Can't change schedules, or add / remove systems.
- Can fail for some configurations of toolchains/linkers.
- Systems in non-
Updateschedules are hot-patched, but you need to have a way to re-enter their schedule- Not possible for system in
Startupschedule. - For systems in
OnEnter(State)schedules, you can exit then re-enter the state.
- Not possible for system in
Bevy sends an HotPatched message when an hot-patch is applied. You can react to this event to trigger systems or state changes.
This feature is new in Bevy 0.17 and we hope to improve it in the future, to support more use cases.
In large projects, hot-patching can take longer, or not work because of the workspace being separated in multiple crates. Early adopters have found it helpful to have a small crate with the code they're currently changing, and once they're happy to port it back in their main workspace.
And assets
There is also hot-reloading for assets, on file change, with the file_watcher feature.
Progress Report
What You've learned
- Bevy dependencies, and its features
- Disabling default features for build time and size, and for runtime performances
- Knowing the list of features
- Application creation and adding Bevy default plugins
- Creating the
Appstruct - And adding the
DefaultPlugins
- Creating the
- Schedules and adding systems
- Adding system with
App::add_systems - To a
Schedule - From the list of schedules
- Adding system with
- Basic use of commands and queries
- States, and running system only on a state or during state transition
- Code organization with plugins
- The
Plugintrait
- The
- Hot-patching systems
- With the
hotpatchingBevy feature - And the Dioxus CLI
- With the
Infotainment Dashboard
In this section, you will learn how to:
- Render and place images in 2D
- React to user input
- Share information between systems
- Write your first shader
Turn Signals
Basic Bevy App
We'll start with the basic Bevy app, and a Camera2d.
For 2d, it's ofen useful to set the ImagePlugin to default to nearest sampling to avoid blurry images.
extern crate bevy;
use bevy::prelude::*;

fn main() {
    App::new()
        .add_plugins(DefaultPlugins.set(ImagePlugin::default_nearest()))
        .add_systems(Startup, setup)
        .run();
}

fn setup(mut commands: Commands) {
    commands.spawn(Camera2d);
}
Displaying an image
Displaying an image is done with the Sprite component, and loading the file is done with the AssetServer resource.
#![allow(unused)]
fn main() {
extern crate bevy;
extern crate bevy_ecs;
use bevy::prelude::*;
fn setup(mut commands: Commands, asset_server: Res<AssetServer>)
{
    commands.spawn(
        Sprite::from_image(
            asset_server.load("signals/signal_left.png"),
        )
    );
}
}
Adding this system to a Startup schedule will display the image at the center of the screen.
Changing the position of the image can be done by adding a Transform component to the entity.
#![allow(unused)]
fn main() {
extern crate bevy;
extern crate bevy_ecs;
use bevy::prelude::*;
fn setup(mut commands: Commands, asset_server: Res<AssetServer>)
{
    commands.spawn((
        Sprite::from_image(
            asset_server.load("signals/signal_left.png"),
        ),
        Transform::from_xyz(-50.0, 0.0, 0.0),
    ));
}
}
This will display the image to the left of the center of the screen.
We also want to display the right signal on the right side, and have both images closer to the top of the screen. We could individually set the Transform of both sprites, but it's better to use hierarchy for that, set the transform of the group, then have each signal be a child of the group and placed relative to it.
#![allow(unused)]
fn main() {
extern crate bevy;
extern crate bevy_ecs;
use bevy::prelude::*;
fn setup(mut commands: Commands, asset_server: Res<AssetServer>)
{
    commands.spawn((
        Transform::from_xyz(0.0, 300.0, 0.0),
        children![
            (
                Sprite::from_image(
                    asset_server.load("signals/signal_left.png"),
                ),
                Transform::from_xyz(-50.0, 0.0, 0.0),
            ),
            (
                Sprite::from_image(
                    asset_server.load("signals/signal_right.png"),
                ),
                Transform::from_xyz(50.0, 0.0, 0.0),
            )
        ],
    ));
}
}
The turn signal plugin is adding this setup system to the Startup schedule of the app:
#![allow(unused)]
fn main() {
extern crate bevy;
use bevy::prelude::*;
fn setup() {}
pub fn turn_plugin(app: &mut App) {
    app.add_systems(Startup, setup);
}
}
Turning off the signals
Right now the signals are brightly colored, but we want them to be dim when they are not active.
Instead of calling the Sprite::from_image helper function to create a sprite, we can set each field of the struct to the value we need, that gives us more configurability. In this case we can set the image field to the image, and the color field to tint the image darker.
#![allow(unused)]
fn main() {
extern crate bevy;
extern crate bevy_ecs;
use bevy::{color::palettes, prelude::*};
fn setup(asset_server: Res<AssetServer>) {
Sprite {
    image: asset_server.load("signals/signal_left.png"),
    color: palettes::tailwind::GRAY_800.into(),
    ..default()
}
;
}
}
We'll also add a marker component to be able to tag the turn signals group.
#![allow(unused)]
fn main() {
extern crate bevy;
extern crate bevy_ecs;
use bevy::prelude::*;
#[derive(Component)]
struct TurnSignalIndicator;
}
A marker component is a Zero Sized Type. This means that it doesn't take up any space in memory, and can be used to tag entities without adding any additional data to them, making it easy to write queries targeting them.
Our setup system becomes:
#![allow(unused)]
fn main() {
extern crate bevy;
extern crate bevy_ecs;
use bevy::{color::palettes, prelude::*};
#[derive(Component)]
struct TurnSignalIndicator;
fn setup(mut commands: Commands, asset_server: Res<AssetServer>) {
    commands.spawn((
        Transform::from_xyz(0.0, 300.0, 0.0),
        Visibility::Visible, // Needed to remove a warning in Bevy
        TurnSignalIndicator,
        children![
            (
                Sprite {
                    image: asset_server.load("signals/signal_left.png"),
                    color: palettes::tailwind::GRAY_800.into(),
                    ..default()
                },
                Transform::from_xyz(-50.0, 0.0, 0.0),
            ),
            (
                Sprite {
                    image: asset_server.load("signals/signal_right.png"),
                    color: palettes::tailwind::GRAY_800.into(),
                    ..default()
                },
                Transform::from_xyz(50.0, 0.0, 0.0),
            )
        ],
    ));
}
}
Turning
Reacting to User Input
We'll add an event that we can trigger when the users press the turn signal buttons:
#![allow(unused)]
fn main() {
extern crate bevy;
extern crate bevy_ecs;
use bevy::prelude::*;
#[derive(Event)]
enum TurnSignal {
    Left,
    Right,
    Stop,
}
}
And a system that react on keyboard input to trigger that event:
#![allow(unused)]
fn main() {
extern crate bevy;
extern crate bevy_ecs;
use bevy::prelude::*;
#[derive(Event)]
enum TurnSignal {
    Left,
    Right,
    Stop,
}
fn react_to_input(keyboard: Res<ButtonInput<KeyCode>>, mut commands: Commands) {
    if keyboard.just_pressed(KeyCode::ArrowLeft) {
        commands.trigger(TurnSignal::Left);
    } else if keyboard.just_pressed(KeyCode::ArrowRight) {
        commands.trigger(TurnSignal::Right);
    } else if keyboard.just_pressed(KeyCode::Enter) {
        commands.trigger(TurnSignal::Stop);
    };
}
}
Why trigger an event rather than do the change directly?
This helps with dissociating the input from the actual change, allowing for more flexibility and easier testing.
It also helps if later we need to add other triggers for the same event, for example once our car is self-driving.
Making the Lights Blink
We need two more parts:
- a system that will make the image blink over time
- an observer system that will react to the
TurnSignalevent and will mark the entity that needs to blink
We need a Blink component with a Timer:
#![allow(unused)]
fn main() {
extern crate bevy;
extern crate bevy_ecs;
use bevy::prelude::*;
#[derive(Component)]
struct Blink {
    target: Entity,
    timer: Timer,
}
}
and an helper to create it:
#![allow(unused)]
fn main() {
extern crate bevy;
extern crate bevy_ecs;
use bevy::prelude::*;
#[derive(Component)]
struct Blink {
    target: Entity,
    timer: Timer,
}
impl Blink {
    fn on_entity(entity: Entity) -> Self {
        Self {
            target: entity,
            timer: Timer::from_seconds(0.5, TimerMode::Repeating),
        }
    }
}
}
To make the signal blink, we'll change the color field of the Sprite component, every time the timer is finished:
#![allow(unused)]
fn main() {
extern crate bevy;
extern crate bevy_ecs;
use bevy::{color::palettes, prelude::*};
#[derive(Component)]
struct Blink {
    target: Entity,
    timer: Timer,
}
fn blink(mut blink: Single<&mut Blink>, mut sprites: Query<&mut Sprite>, time: Res<Time>) {
    if blink.timer.tick(time.delta()).just_finished() {
        let mut sprite = sprites.get_mut(blink.target).unwrap();
        sprite.color = if sprite.color == Color::WHITE {
            palettes::tailwind::GRAY_800.into()
        } else {
            Color::WHITE
        };
    }
}
}
Observing the Event
This system will only run when it received a TurnSignal event:
- it will start by turning off all the signals
- then mark the correct one as blinking according to the event
#![allow(unused)]
fn main() {
extern crate bevy;
extern crate bevy_ecs;
use bevy::{color::palettes, prelude::*};
#[derive(Component)]
struct Blink {
    target: Entity,
    timer: Timer,
}
#[derive(Event)]
enum TurnSignal {
    Left,
    Right,
    Stop,
}
#[derive(Component)]
struct TurnSignalIndicator;
impl Blink {
    fn on_entity(entity: Entity) -> Self {
        Self {
            target: entity,
            timer: Timer::from_seconds(0.5, TimerMode::Repeating),
        }
    }
}
fn update_turn_signal(
    signal: On<TurnSignal>,
    indicator: Single<(Entity, &Children), With<TurnSignalIndicator>>,
    mut commands: Commands,
    mut sprites: Query<&mut Sprite>,
) {
    sprites.get_mut(indicator.1[0]).unwrap().color = palettes::tailwind::GRAY_800.into();
    sprites.get_mut(indicator.1[1]).unwrap().color = palettes::tailwind::GRAY_800.into();

    match signal.event() {
        TurnSignal::Left => {
            commands
                .entity(indicator.0)
                .insert(Blink::on_entity(indicator.1[0]));
        }
        TurnSignal::Right => {
            commands
                .entity(indicator.0)
                .insert(Blink::on_entity(indicator.1[1]));
        }
        TurnSignal::Stop => {
            commands.entity(indicator.0).remove::<Blink>();
        }
    }
}
}
Updating the Plugin
We now need to update the plugin to use the new systems and observer:
#![allow(unused)]
fn main() {
extern crate bevy;
extern crate bevy_ecs;
use bevy::{color::palettes, prelude::*};
#[derive(Event)]
enum TurnSignal {
    Left,
    Right,
    Stop,
}
fn setup() {}
fn react_to_input() {}
fn blink() {}
fn update_turn_signal(signal: On<TurnSignal>) {}
pub fn turn_plugin(app: &mut App) {
    app.add_systems(Startup, setup)
        .add_systems(Update, (react_to_input, blink))
        .add_observer(update_turn_signal);
}
}
Speedometer
Solutions for those exercises are behind the speedometer feature.
Displaying the Speedometer
Display the speedometer images, with the images available in the assets/speedometer folder.
Tips:
- The hand will need a position relative to the dial
- It will need to rotate around the center of the dial which is not the center of the image
- The hand itself is too large and needs to be scaled down
- It will rotate not around the center of itself, but around the dot in the image
Hierarchy and positions that can be used:
[
  (dial image, default position),
  (hand group, (0.0, -125.0, 0.0) with scale (0.5),
    [
      (hand image, (0.0, 150.0, 0.0))
    ]
  )
]
Making the Car Move
While the space bar is pressed, the car speed should increase. The speedometer hand should point to the correct speed.
- Add a
Resourcethat will hold the speed (af32)- Don't forget to initialize the resource in the application
- Add a
Systemthat will increase the speed when the space bar is pressed, and decrease it when the space bar is not pressed - Add a
Systemthat will rotate the hand based on the speed- You will need to rotate the hand group from above, not the hand image. A marker component can help you select the correct entity
- Rotation is done with
Quaternions Quat::from_rotation_z(-speed.0 / 160.0 * 3.0 + 1.5)works well for the speedometer hand rotation
Odometer
Solutions for those exercises are behind the odometer feature.
Displaying the Distance Traveled
Now that our car is moving, it would be nice to display the distance traveled. We can do this by displaying text and updating it every frame.
Tips:
- Use the
Text2dcomponent to display the distance traveled - An
Odometermarker component can help selecting the correct entity when updating - Add a
Distanceresource to track the distance traveled - Add a system that will update the distance according to the speed and the time elapsed since the last update
- The
Timeresource can give you the time delta since the last update
- The
- Add a system that will update the text displayed with the distance traveled
Battery Level
Our car can't run forever, so we need to manage the battery level.
Manage the Battery
Let's add a resource to keep track of the battery level.
#![allow(unused)]
fn main() {
extern crate bevy;
extern crate bevy_ecs;
extern crate bevy_render;
extern crate bevy_asset;
extern crate bevy_reflect;
extern crate encase;
use bevy::prelude::*;
#[derive(Resource)]
pub struct BatteryLevel(f32);
}
We'll also need a system to update the battery level depending on the car's speed.
#![allow(unused)]
fn main() {
extern crate bevy;
extern crate bevy_ecs;
extern crate bevy_render;
extern crate bevy_asset;
extern crate bevy_reflect;
extern crate encase;
use bevy::prelude::*;
#[derive(Resource)]
pub struct BatteryLevel(f32);
#[derive(Resource)]
pub struct Speed(f32);
fn update_battery(
    mut battery: ResMut<BatteryLevel>,
    speed: Res<Speed>,
    time: Res<Time>,
) {
    battery.0 = (battery.0 - (time.delta_secs() * (speed.0.powf(2.0)) / 1500.0)).max(0.0);
    if battery.0 <= 0.0 {
        println!("Battery is empty!");
    }
}
}
And to add those to our app, a simple plugin:
#![allow(unused)]
fn main() {
extern crate bevy;
extern crate bevy_ecs;
extern crate bevy_render;
extern crate bevy_asset;
extern crate bevy_reflect;
extern crate encase;
use bevy::prelude::*;
#[derive(Resource)]
pub struct BatteryLevel(f32);
fn update_battery() {}
pub fn battery_plugin(app: &mut App) {
    app.add_systems(Update, update_battery)
        .insert_resource(BatteryLevel(100.0));
}
}
Display the Battery Level
The driver should be able to know the battery level. We could display it as text, but let's make a nicer indicator!
We'll write a simple shader. Let's start by defining the material we'll use. In this case we just need to send a f32 (the battery level) to the shader, it doesn't need anything else as data to be displayed.
#![allow(unused)]
fn main() {
extern crate bevy;
extern crate bevy_ecs;
extern crate bevy_render;
extern crate bevy_asset;
extern crate bevy_reflect;
extern crate encase;
use bevy::{
    prelude::*,
    render::render_resource::{AsBindGroup, ShaderType},
    shader::ShaderRef,
    sprite_render::{Material2d, Material2dPlugin},
};
#[derive(Asset, TypePath, AsBindGroup, ShaderType, Clone)]
#[uniform(0, BatteryMaterial)]
struct BatteryMaterial {
    level: f32,
}

impl<'a> From<&'a BatteryMaterial> for BatteryMaterial {
    fn from(material: &'a BatteryMaterial) -> Self {
        material.clone()
    }
}

impl Material2d for BatteryMaterial {
    fn fragment_shader() -> ShaderRef {
        "shaders/battery_bar.wgsl".into()
    }
}
}
The first step is to define which data we'll send to the GPU. In our case we just need a f32, so it's a simple struct.
Next is to implement the Material2d trait for our material. This trait lets us define the shader used to render the material.
The Material2d trait needs the Asset trait which needs the TypePath trait, and those can be directly derived. It also needs the AsBindGroup trait which can be derived, but needs some attributes, in this case #[uniform(0, BatteryMaterial)]
uniformis the address space: https://www.w3.org/TR/WGSL/#address-spaces-uniform0is the binding indexBatteryMaterialis the Rust struct matching the memory representation on the GPU
Our shader will be written in WGSL.
struct Material {
    level: f32,
}

@group(2) @binding(0)
var<uniform> material: Material;
- The struct
Materialmust have the same memory representation as the Rust structBatteryMaterial. - The
varmust have the same address space and binding as the attribute to theAsBindGroupderive. The group 2 is the one used by default for user defined data.
#import bevy_sprite::{
    mesh2d_vertex_output::VertexOutput,
}

@fragment
fn fragment(in: VertexOutput) -> @location(0) vec4<f32> {
    if abs(in.uv.x - 0.5) < 0.005 {
        // if we are close to the center of the mesh, draw a line in a lighter blue
        return vec4(0.0, 0.7, 0.8, 1.0);
    }

    if in.uv.x < material.level {
        // if we are at a value that's less than the battery level,
        // fill with a color that is between red and blue,
        // closer to red as the level is lower
        return mix(
            vec4(0.9, 0.1, 0.1, 1.0),
            vec4(0.1, 0.4, 0.9, 1.0),
            smoothstep(0.1, 0.75, material.level)
        );
    } else {
        // otherwise just return black
        return vec4(0.0, 0.0, 0.0, 0.0);
    }
}
- Import syntax is an extension of WGSL from Bevy. It lets us reuse types and functions between shaders.
@fragmentdefines the method called by the fragment shader. It takes the output of the vertex shader as input. As we didn't define one in this case, it's the default one defined by Bevy. It's return value is a RGBA color as avec4<f32>.
All that is left is using our new material! For that we'll need to add Material2dPlugin::<BatteryMaterial>::default() as a plugin to the application, a mesh using the material and a system to update the material level.
#![allow(unused)]
fn main() {
extern crate bevy;
extern crate bevy_ecs;
extern crate bevy_render;
extern crate bevy_asset;
extern crate bevy_reflect;
extern crate encase;
use bevy::{
    prelude::*,
    render::render_resource::{AsBindGroup, ShaderType},
    shader::ShaderRef,
    sprite_render::{Material2d, Material2dPlugin},
};
#[derive(Asset, TypePath, AsBindGroup, ShaderType, Clone)]
#[uniform(0, BatteryMaterial)]
struct BatteryMaterial {
    level: f32,
}
impl<'a> From<&'a BatteryMaterial> for BatteryMaterial {
    fn from(material: &'a BatteryMaterial) -> Self {
        material.clone()
    }
}
impl Material2d for BatteryMaterial {
    fn fragment_shader() -> ShaderRef {
        "shaders/battery_bar.wgsl".into()
    }
}
#[derive(Resource)]
struct BatteryLevel(f32);
fn setup(
    mut commands: Commands,
    mut meshes: ResMut<Assets<Mesh>>,
    mut materials: ResMut<Assets<BatteryMaterial>>,
) {
    commands.spawn((
        Mesh2d(meshes.add(Rectangle::new(300.0, 50.0))),
        MeshMaterial2d(materials.add(BatteryMaterial { level: 1.0 })),
    ));
}

fn display_battery(
    battery: Res<BatteryLevel>,
    material: Single<&MeshMaterial2d<BatteryMaterial>>,
    mut progress_materials: ResMut<Assets<BatteryMaterial>>,
) {
    if battery.is_changed() {
        progress_materials.get_mut(material.id()).unwrap().level = battery.0 / 100.0;
    }
}
}
Recharge the Battery
The battery is either unplugged, and the car can move, or charging and the car can't move.
We will handle this with a state, to be able to toggle systems depending on the current state.
#![allow(unused)]
fn main() {
extern crate bevy;
extern crate bevy_ecs;
extern crate bevy_render;
extern crate bevy_asset;
extern crate bevy_reflect;
extern crate bevy_state;
extern crate encase;
use bevy::prelude::*;
#[derive(Debug, Clone, Copy, Eq, PartialEq, Hash, States, Default)]
pub enum BatteryStatus {
    Charging,
    #[default]
    Unplugged,
}
}
The existing update_battery system should only run when the battery is unplugged, and we're going to add a new system to charge the battery when it's charging. Both systems should switch to the other state when the battery is either full or empty.
#![allow(unused)]
fn main() {
extern crate bevy;
extern crate bevy_ecs;
extern crate bevy_render;
extern crate bevy_asset;
extern crate bevy_reflect;
extern crate bevy_state;
extern crate encase;
use bevy::{
    prelude::*,
    render::render_resource::{AsBindGroup, ShaderType},
    shader::ShaderRef,
    sprite_render::{Material2d, Material2dPlugin},
};
#[derive(Debug, Clone, Copy, Eq, PartialEq, Hash, States, Default)]
pub enum BatteryStatus {
    Charging,
    #[default]
    Unplugged,
}
#[derive(Resource)]
pub struct BatteryLevel(f32);
#[derive(Resource)]
pub struct Speed(f32);
#[derive(Asset, TypePath, AsBindGroup, ShaderType, Clone)]
#[uniform(0, BatteryMaterial)]
struct BatteryMaterial {
    level: f32,
}
impl<'a> From<&'a BatteryMaterial> for BatteryMaterial {
    fn from(material: &'a BatteryMaterial) -> Self {
        material.clone()
    }
}
impl Material2d for BatteryMaterial {
    fn fragment_shader() -> ShaderRef {
        "shaders/battery_bar.wgsl".into()
    }
}
fn update_battery(
    mut battery: ResMut<BatteryLevel>,
    speed: Res<Speed>,
    time: Res<Time>,
    mut next_state: ResMut<NextState<BatteryStatus>>,
) {
    battery.0 = (battery.0 - (time.delta_secs() * (speed.0.powf(2.0)) / 1500.0)).max(0.0);
    if battery.0 <= 0.0 {
        next_state.set(BatteryStatus::Charging);
    }
}

fn charging_battery(
    mut battery: ResMut<BatteryLevel>,
    time: Res<Time>,
    mut next_state: ResMut<NextState<BatteryStatus>>,
) {
    battery.0 = (battery.0 + time.delta_secs() * 10.0).min(100.0);
    if battery.0 >= 100.0 {
        next_state.set(BatteryStatus::Unplugged);
    }
}
}
Another change to do is in the speedometer system that updates the speed:
- it should only run in the
BatteryStatus::Unpluggedstate - a new system should set the speed to
0.0when the battery is charging
The battery_plugin should now look like this:
#![allow(unused)]
fn main() {
extern crate bevy;
extern crate bevy_ecs;
extern crate bevy_render;
extern crate bevy_asset;
extern crate bevy_reflect;
extern crate bevy_state;
extern crate encase;
use bevy::{
    prelude::*,
    render::render_resource::{AsBindGroup, ShaderType},
    shader::ShaderRef,
    sprite_render::{Material2d, Material2dPlugin},
};
fn setup() {}
fn update_battery() {}
fn charging_battery() {}
fn display_battery() {}
#[derive(Debug, Clone, Copy, Eq, PartialEq, Hash, States, Default)]
pub enum BatteryStatus {
    Charging,
    #[default]
    Unplugged,
}
#[derive(Resource)]
pub struct BatteryLevel(f32);
#[derive(Resource)]
pub struct Speed(f32);
#[derive(Asset, TypePath, AsBindGroup, ShaderType, Clone)]
#[uniform(0, BatteryMaterial)]
struct BatteryMaterial {
    level: f32,
}
impl<'a> From<&'a BatteryMaterial> for BatteryMaterial {
    fn from(material: &'a BatteryMaterial) -> Self {
        material.clone()
    }
}
impl Material2d for BatteryMaterial {
    fn fragment_shader() -> ShaderRef {
        "shaders/battery_bar.wgsl".into()
    }
}
pub fn battery_plugin(app: &mut App) {
    app.add_plugins(Material2dPlugin::<BatteryMaterial>::default())
        .init_state::<BatteryStatus>()
        .add_systems(Startup, setup)
        .add_systems(
            Update,
            (
                update_battery.run_if(in_state(BatteryStatus::Unplugged)),
                charging_battery.run_if(in_state(BatteryStatus::Charging)),
                display_battery,
            ),
        )
        .insert_resource(BatteryLevel(100.0));
}
}
Display Battery Indicators
Car dashboard should have more indicators! We'll add one for the battery, with three states:
- Charging
- Ok
- Low
Changing the setup system to display those indicators:
#![allow(unused)]
fn main() {
extern crate bevy;
extern crate bevy_ecs;
extern crate bevy_render;
extern crate bevy_asset;
extern crate bevy_reflect;
extern crate bevy_state;
extern crate encase;
use bevy::{
    prelude::*,
    render::render_resource::{AsBindGroup, ShaderType},
    shader::ShaderRef,
    sprite_render::{Material2d, Material2dPlugin},
};
fn update_battery() {}
fn charging_battery() {}
fn display_battery() {}
#[derive(Debug, Clone, Copy, Eq, PartialEq, Hash, States, Default)]
pub enum BatteryStatus {
    Charging,
    #[default]
    Unplugged,
}
#[derive(Resource)]
pub struct BatteryLevel(f32);
#[derive(Resource)]
pub struct Speed(f32);
#[derive(Asset, TypePath, AsBindGroup, ShaderType, Clone)]
#[uniform(0, BatteryMaterial)]
struct BatteryMaterial {
    level: f32,
}
impl<'a> From<&'a BatteryMaterial> for BatteryMaterial {
    fn from(material: &'a BatteryMaterial) -> Self {
        material.clone()
    }
}
impl Material2d for BatteryMaterial {
    fn fragment_shader() -> ShaderRef {
        "shaders/battery_bar.wgsl".into()
    }
}
#[derive(Component)]
struct BatteryIndicator;
fn setup(
    mut commands: Commands,
    asset_server: Res<AssetServer>,
    mut meshes: ResMut<Assets<Mesh>>,
    mut materials: ResMut<Assets<BatteryMaterial>>,
) {
    commands.spawn((
        Transform::from_xyz(-500.0, -300.0, 0.0).with_scale(Vec3::splat(0.75)),
        Visibility::Visible,
        BatteryIndicator,
        children![
            (
                Sprite::from_image(asset_server.load("signals/battery_charging.png")),
                Visibility::Hidden
            ),
            (
                Sprite::from_image(asset_server.load("signals/battery_low.png")),
                Visibility::Hidden
            ),
            (
                Sprite::from_image(asset_server.load("signals/battery_ok.png")),
                Visibility::Hidden
            ),
            (
                Mesh2d(meshes.add(Rectangle::new(300.0, 50.0))),
                MeshMaterial2d(materials.add(BatteryMaterial { level: 1.0 })),
                Transform::from_xyz(250.0, 0.0, 0.0),
            )
        ],
    ));
}
}
And we'll update the display_battery system to switch the indicator depending on the battery state and level.
#![allow(unused)]
fn main() {
extern crate bevy;
extern crate bevy_ecs;
extern crate bevy_render;
extern crate bevy_asset;
extern crate bevy_reflect;
extern crate bevy_state;
extern crate encase;
use bevy::{
    prelude::*,
    render::render_resource::{AsBindGroup, ShaderType},
    shader::ShaderRef,
    sprite_render::{Material2d, Material2dPlugin},
};
fn setup() {}
fn update_battery() {}
fn charging_battery() {}
#[derive(Debug, Clone, Copy, Eq, PartialEq, Hash, States, Default)]
pub enum BatteryStatus {
    Charging,
    #[default]
    Unplugged,
}
#[derive(Resource)]
pub struct BatteryLevel(f32);
#[derive(Resource)]
pub struct Speed(f32);
#[derive(Asset, TypePath, AsBindGroup, ShaderType, Clone)]
#[uniform(0, BatteryMaterial)]
struct BatteryMaterial {
    level: f32,
}
impl<'a> From<&'a BatteryMaterial> for BatteryMaterial {
    fn from(material: &'a BatteryMaterial) -> Self {
        material.clone()
    }
}
impl Material2d for BatteryMaterial {
    fn fragment_shader() -> ShaderRef {
        "shaders/battery_bar.wgsl".into()
    }
}
#[derive(Component)]
struct BatteryIndicator;
fn display_battery(
    battery: Res<BatteryLevel>,
    indicator: Single<&Children, With<BatteryIndicator>>,
    mut visibility: Query<&mut Visibility>,
    material: Single<&MeshMaterial2d<BatteryMaterial>>,
    mut progress_materials: ResMut<Assets<BatteryMaterial>>,
    battery_status: Res<State<BatteryStatus>>,
) {
    if battery.is_changed() {
        progress_materials.get_mut(material.id()).unwrap().level = battery.0 / 100.0;

        match battery_status.get() {
            BatteryStatus::Charging => {
                *visibility.get_mut(indicator[0]).unwrap() = Visibility::Visible;
                *visibility.get_mut(indicator[1]).unwrap() = Visibility::Hidden;
                *visibility.get_mut(indicator[2]).unwrap() = Visibility::Hidden;
            }
            BatteryStatus::Unplugged if battery.0 < 20.0 => {
                *visibility.get_mut(indicator[0]).unwrap() = Visibility::Hidden;
                *visibility.get_mut(indicator[1]).unwrap() = Visibility::Visible;
                *visibility.get_mut(indicator[2]).unwrap() = Visibility::Hidden;
            }
            BatteryStatus::Unplugged => {
                *visibility.get_mut(indicator[0]).unwrap() = Visibility::Hidden;
                *visibility.get_mut(indicator[1]).unwrap() = Visibility::Hidden;
                *visibility.get_mut(indicator[2]).unwrap() = Visibility::Visible;
            }
        }
    }
}
}
Radio
Solutions for those exercises are behind the radio feature.
Display a Song Title and Artist
Display the song title and artist that are currently playing.
Tips:
- Build a static list of songs
- Display its information
- Change after a few minutes
Display the Album Cover
It would be prettier with album covers
Tips:
- A few are provided from The Beatles albums
- Display an image with the cover over the song title and artist
Display a Progress Bar
Display a progress bar to know where we are in a song.
Tips:
- Add a resource keeping track of the current song's progress
- Update the progress bar from the
Timeresource - Write a simple shader to draw the progress bar
Progress Report
What You've learned
- Displaying and placing images in 2D
- With the
Spritecomponent - And the
Transformcomponent
- With the
- Loading assets from files
- With the
AssetServerresource
- With the
- Creating your own components and resources with the derive
- The
Componenttrait - The
Resourcetrait
- The
- Reacting to user keyboard input
- With the
ButtonInput<KeyCode>resource KeyCodefor location-insensitive keyboard events
- With the
- Creating events, triggering them and observing them
- Deriving the
Eventtrait - Triggering them with
Commands::trigger - Reacting to them with an observer and the
Onsystem parameter
- Deriving the
- Displaying text in 2D
- With the
Text2Dcomponent
- With the
- Writing a simple shader
- Creating a material with the
Material2dtrait - Sending data to the shader with the
AsBindGroupandShaderTypetraits - Enabling it in Bevy with the
Material2dPluginplugin
- Creating a material with the
Home Automation
In this section, you will learn how to:
- Render and place meshes and models in 3D
- Interact with external async APIs
- The new (and experimental) Bevy UI widgets: Bevy Feathers
- Using gizmos to display information
Home Setup
Basic Bevy App
We'll start with the basic Bevy app, with a setup system displaying our 3D scene.
extern crate bevy;
use bevy::{
    prelude::*,
};

fn main() {
    App::new()
        .add_plugins(DefaultPlugins)
        .add_systems(Startup, setup)
        .run();
}
fn setup() {}
Setting up the 3D Scene
For our home automation visualization, we need a 3D camera looking down at the home model.
#![allow(unused)]
fn main() {
extern crate bevy;
use bevy::prelude::*;
fn setup(
    mut commands: Commands,
    asset_server: Res<AssetServer>,
    mut meshes: ResMut<Assets<Mesh>>,
    mut materials: ResMut<Assets<StandardMaterial>>,
) {
    commands.spawn((
        Camera3d::default(),
        Transform::from_xyz(0., 20., 1.0).looking_at(Vec3::new(0.0, 0.3, 0.0), Vec3::Y),
    ));

    commands.spawn(SceneRoot(
        asset_server.load(GltfAssetLabel::Scene(0).from_asset("1np-simple.glb")),
    ));

    // Fake ceiling to block light
    commands.spawn((
        Mesh3d(meshes.add(Cuboid::new(12.4, 0.1, 11.5))),
        MeshMaterial3d(materials.add(StandardMaterial {
            base_color: Color::linear_rgba(0.0, 0.0, 0.0, 0.1),
            alpha_mode: AlphaMode::Blend,
            reflectance: 0.0,
            ..default()
        })),
        Transform::from_xyz(0.0, 2.7, -0.4),
        Pickable::IGNORE,
    ));
}
}
Adding a Camera
The camera is positioned at (0.0, 20.0, 1.0) - high above the scene - and looks down at the center of the home.
Loading the Home Model
The home model is loaded from a GLTF file using the AssetServer resource and the SceneRoot component.
When loading a scene, like a glTF file, Bevy will automatically load the scene and add it to the hierarchy under the entity with the SceneRoot component.
Creating a Fake Ceiling
To make the lighting more realistic, we add a semi-transparent ceiling that blocks light from above. This is done by spawning a cuboid mesh with a dark, semi-transparent material.
The ceiling is a thin cuboid . The material uses AlphaMode::Blend to make it semi-transparent, and Pickable::IGNORE ensures it won't interfere with mouse interactions in the scene.
As light transmission is more expensive to compute, this is enabled separately from transparency, so our ceiling will be see through but will not let outside light through.
Spawning the lights
We need to show where the indoor lights are in our house. As it's a simplified model, we'll use the same light everywhere.
To display a basic shape in 3D, we can use the Mesh3d component and the MeshMaterial3d component.
To add a light, we can use the PointLight component. Setting its intensity to 0.0 will turn it off.
We can use an helper function to spawn all our lights in the same way:
#![allow(unused)]
fn main() {
extern crate bevy;
extern crate bevy_ecs;
use bevy::{light::NotShadowCaster, prelude::*};
#[derive(Component)]
struct Light;
fn spawn_lights(
    commands: &mut Commands,
    position: Vec2,
    mesh: Handle<Mesh>,
    material: Handle<StandardMaterial>,
    light: Light,
) {
    commands
        .spawn((
            Mesh3d(mesh),
            MeshMaterial3d(material),
            Transform::from_translation(position.extend(2.5).xzy()),
            PointLight {
                shadows_enabled: true,
                intensity: 0.0,
                ..default()
            },
            NotShadowCaster,
            light,
        ));
}
}
We can now use this function to spawn all our lights. We'll also add an enum component to be able to identify each light.
#![allow(unused)]
fn main() {
extern crate bevy;
extern crate bevy_ecs;
use bevy::{color::palettes::tailwind, light::NotShadowCaster, prelude::*};
fn spawn_lights(
    commands: &mut Commands,
    position: Vec2,
    mesh: Handle<Mesh>,
    material: Handle<StandardMaterial>,
    light: Light,
) {}
#[derive(Component, Clone, Copy, Hash, PartialEq, Eq, Debug)]
pub enum Light {
    Bedroom1,
    Bedroom2,
    Bathroom1,
    Bathroom2,
    Toilets,
    LivingRoom1,
    LivingRoom2,
    Kitchen,
    Hall,
    Hallway,
}

fn light_setup(
    mut commands: Commands,
    mut meshes: ResMut<Assets<Mesh>>,
    mut materials: ResMut<Assets<StandardMaterial>>,
) {
    let light_mesh = meshes.add(Sphere::new(0.15));
    let light_material = materials.add(StandardMaterial {
        base_color: tailwind::YELLOW_400.into(),
        unlit: true,
        ..default()
    });

    [
        (vec2(4.5, 2.0), Light::Bedroom1),
        (vec2(-3.5, 2.0), Light::LivingRoom1),
        (vec2(-1.0, 2.0), Light::LivingRoom2),
        (vec2(-4.0, -3.0), Light::Bedroom2),
        (vec2(0.0, -3.0), Light::Kitchen),
        (vec2(-2.0, -4.0), Light::Toilets),
        (vec2(-2.0, -2.0), Light::Bathroom2),
        (vec2(1.5, 3.5), Light::Bathroom1),
        (vec2(1.25, 0.75), Light::Hallway),
        (vec2(4.0, -3.0), Light::Hall),
    ]
    .into_iter()
    .for_each(|(position, name)| {
        spawn_lights(
            &mut commands,
            position,
            light_mesh.clone(),
            light_material.clone(),
            name,
        );
    });
}
}
Faking Time
This example will use more fake data to simulate actual time passing, and a remote server to fetch real-time data.
Let's start with the time simulation.
Faking the Current Time
The current time is stored in a resource. Another resource controls the speed at which time passes.
#![allow(unused)]
fn main() {
extern crate bevy;
extern crate bevy_ecs;
use bevy::prelude::*;
#[derive(Resource, Default)]
pub struct Date {
    pub current_time: u32,
}

#[derive(Resource)]
struct Speed(f32);

fn set_date(time: Res<Time>, speed: Res<Speed>, mut date: ResMut<Date>) {
    date.current_time = (date.current_time
        + ((time.delta_secs() * speed.0 / 60.0) as u32).max(if speed.0 == 0.0 { 0 } else { 1 }))
        % (24 * 60);
}
}
Faking the Sun
We don't want to see the sun sphere in the atmosphere, but we want to simulate the light it provides.
Bevy now supports global illumination through its experimental Solari crate, but it's hardware dependent to be able to use raytracing. You can read more on how it works in the 0.17 release notes.
For a general solution with lower quality, we'll use the DirectionalLight component with shadows enabled, and the AmbientLight resource. A system will change the direction of the light, and the brightness of the ambient light based on the current time.
#![allow(unused)]
fn main() {
extern crate bevy;
extern crate bevy_ecs;
use bevy::prelude::*;
#[derive(Resource, Default)]
pub struct Date {
    pub current_time: u32,
}
use std::f32::consts::*;
fn animate_sun_direction(
    date: Res<Date>,
    mut directional_light: Single<&mut Transform, With<DirectionalLight>>,
    mut ambient_light: ResMut<AmbientLight>,
) {
    let current_time = (date.current_time as f32) / 60.0;
    directional_light.rotation = Quat::from_rotation_x((current_time - 6.0) / 12.0 * PI + PI);
    ambient_light.brightness = (((current_time - 12.0).abs() - 6.0).min(0.0).abs() + 1.0) * 50.0;
}
}
Taking Control of Time
For this project UI, we'll use the experimental Bevy Feathers widgets. For that we'll need to add the FeathersPlugins plugin group, and the UITheme resource.
extern crate bevy;
use bevy::{
    feathers::{FeathersPlugins, dark_theme::create_dark_theme, theme::UiTheme},
    prelude::*,
};

fn main() {
    App::new()
        .add_plugins((DefaultPlugins, FeathersPlugins))
        .insert_resource(UiTheme(create_dark_theme()))
        .add_systems(Startup, setup)
        .run();
}
fn setup() {}
The UI is added in https://github.com/vleue/bevy_workshop-eurorust-2025/blob/main/2-home-automation/src/natural_time.rs#L26.
Faking a Remote Server
In this project, we need to call a remote server to interact with the connected lights. To simulate the server, we will use a static list of changes to the lights that can only be accessed through async functions.
You can find the implementation in https://github.com/vleue/bevy_workshop-eurorust-2025/blob/main/2-home-automation/src/remote_server/internal.rs.
The function signatures are:
trait RemoteServer {
async fn get_current_state(current_time: u32) -> HashMap<Device, u32>;
async fn change_state(_device: Device, new_state: u32);
async fn get_history(device: Device) -> Vec<(u32, u32)>;
}
Toggling Lights
Communication with the Remote Server
We will use events to communicate with the remote server. A first event will be triggered when the user requests the light to change state, an observer on that event will call the remote server in an async task. Once done, the async task will trigger a second event to notify the UI that the light state has changed.
   user request light change
              |
              v
 ManualLightStateChange event
              |
              v
observer call the remote server --async--> remote server state change
                                                      |
                                                      v
                                          ServerLightStateChange event
                                                      |
                                                      v
                                             observer toggle light
What is often done to improve reactivity is to manually send the ServerLightStateChange event without waiting for the response form the remote server, as if it already succeeded.
   user request light change
              |
              v
 ManualLightStateChange event
              |
              v
observer call the remote server --async--> remote server state change
              |
              v
  ServerLightStateChange event
              |
              v
     observer toggle light
Communication Implementation
We can declare our two events:
#![allow(unused)]
fn main() {
extern crate bevy;
extern crate bevy_ecs;
use bevy::prelude::*;
struct Light;
#[derive(Event)]
pub struct ManualLightStateChange {
    pub light: Light,
    pub on: bool,
}

#[derive(Event)]
pub struct ServerLightStateChange {
    pub light: Light,
    pub on: bool,
}
}
And our observer for the ManualLightStateChange event:
#![allow(unused)]
fn main() {
extern crate bevy;
extern crate bevy_ecs;
use bevy::{prelude::*, tasks::IoTaskPool};
#[derive(Event)]
pub struct ManualLightStateChange {
    pub light: Light,
    pub on: bool,
}
#[derive(Event)]
pub struct ServerLightStateChange {
    pub light: Light,
    pub on: bool,
}
mod internal {
    #[derive(Clone, Copy)]
    pub struct Light;
    pub enum Device { Light(Light)}
    pub async fn change_state(device: Device, on: bool) {}
}
use internal::*;
fn forward_state_changes(event: On<ManualLightStateChange>, mut commands: Commands) {
    let light = event.light;
    let on = event.on;
    IoTaskPool::get()
        .spawn(async move {
            internal::change_state(Device::Light(light), on).await;
        })
        .detach();
    commands.trigger(ServerLightStateChange {
        light: event.light,
        on: event.on,
    });
}
}
This observer:
- receives the event
- starts an async task to change the state of the light
- triggers a response event
We are using the IoTaskPool to spawn an async task. If the task is dropped, it could be cancelled, unless it has been detached first.
Bevy exposes three different TaskPools:
IoTaskPool: used by the asset server to load files, recommended for IO-bound tasks that can wait on the OS.ComputeTaskPool: used for task that must finish before the next frame is rendered. Bevy uses this pool for parallelism inside a system. Tasks in this pool must not block for too long or the application will freeze.AsyncComputeTaskPool: used for tasks that can take an arbitrary amount of time, such as long-running computations. Not used by Bevy.
Manually Triggering the Event
The simplest way for the user to trigger the event with our current UI is to have them click on the light they want to toggle. This is easy to enable in Bevy by adding the MeshPickingPlugin, and meshes will now receives Pointer events when being interacted with by a mouse pointer.
Other picking backends available are UiPickingPlugin
and SpritePickingPlugin, for UI and 2d sprites.
#![allow(unused)]
fn main() {
extern crate bevy;
extern crate bevy_ecs;
use bevy::prelude::*;
#[derive(Event)]
pub struct ManualLightStateChange {
    pub light: Light,
    pub on: bool,
}
#[derive(Component, Clone, Copy)]
struct Light;
fn toggle_light(
    event: On<Pointer<Click>>,
    mut commands: Commands,
    light: Query<(&Light, &PointLight)>,
) {
    let (light, point_light) = light.get(event.entity).unwrap();
    commands.trigger(ManualLightStateChange {
        light: *light,
        on: point_light.intensity == 0.0,
    });
}
}
Pointer events are EntityEvent, which means they target a specific entity and must be observed on it.
We must change the `` function to add the observer:
#![allow(unused)]
fn main() {
extern crate bevy;
extern crate bevy_ecs;
use bevy::{light::NotShadowCaster, prelude::*};
#[derive(Component)]
struct Light;
fn toggle_light(event: On<Pointer<Click>>) {}
fn spawn_lights(
    commands: &mut Commands,
    position: Vec2,
    mesh: Handle<Mesh>,
    material: Handle<StandardMaterial>,
    light: Light,
) {
    commands
        .spawn((
            Mesh3d(mesh),
            MeshMaterial3d(material),
            Transform::from_translation(position.extend(2.5).xzy()),
            PointLight {
                shadows_enabled: true,
                intensity: 0.0,
                ..default()
            },
            NotShadowCaster,
            light,
        ))
        .observe(toggle_light);
}
}
Reacting to the server response
When receiving the ServerLightStateChange event, we should find the matching light thanks to its Light component, and change its intensity.
#![allow(unused)]
fn main() {
extern crate bevy;
extern crate bevy_ecs;
use bevy::prelude::*;
#[derive(Event)]
pub struct ServerLightStateChange {
    pub light: Light,
    pub on: bool,
}
#[derive(Component, PartialEq, Eq)]
struct Light;
fn on_light_state_changed(
    message: On<ServerLightStateChange>,
    mut light: Query<(&mut PointLight, &Light)>,
) {
    for (mut light, light_data) in light.iter_mut() {
        if *light_data == message.light {
            if message.on {
                light.intensity = 300000.0;
            } else {
                light.intensity = 0.0;
            }
        }
    }
}
}
Displaying the Current State
Solutions for those exercises are behind the current_state feature.
Make the lights reflects their current state in the scene
Lights should reflect their current state from the server point of view, in case the house inhabitants turn them on or off without using our application.
Add a system that will poll the get_current_state function from the fake remote server, and send events to the lights to update their state.
Tips:
- Add a system in the
Updateschedule to poll - Use a crossbeam channel to retrieve data out of the async task. Other synchronization primitives can be used if you prefer
- Open the channel, start the task and use the sender in the task
- keep the receiver in the system in a
Localsystem parameter:Local<Option<Receiver<HashMap<Device, bool>>>>
- If the channel is empty, the task is still running, so we can wait for it to finish and then try again later. Just exit the system right ahead
- If there is a message in the channel, the task has finished we can update the light state
- Compare with the last known state to avoid unnecessary updates
Light Information
Light Information Panel
Instead of toggling the light on click, we will now use Bevy Feathers widgets to display a panel with the light name, and a toggle switch to turn it on or off.
You can view the panel declaration there: https://github.com/vleue/bevy_workshop-eurorust-2025/blob/main/2-home-automation/src/lights.rs#L121
Selected Light Gizmo
Gizmos are a great way to draw information directly on screen. By default they are in immediate mode, meaning they must be redrawn every frame. If you have a lot of gizmos or they are mostly static, you can use the retained mode.
We'll draw a simple gizmo around the selected light, and make it dynamic to draw attention to it.
#![allow(unused)]
fn main() {
extern crate bevy;
extern crate bevy_ecs;
use bevy::{color::palettes::tailwind, prelude::*};
#[derive(Component)]
struct LightPanel(f32, Entity);
fn highlight_light(
    selected_light: Single<&LightPanel>,
    transform: Query<&Transform>,
    mut gizmos: Gizmos,
    time: Res<Time>,
) {
    let transform = transform.get(selected_light.1).unwrap();
    gizmos.sphere(
        transform.to_isometry(),
        0.25 + (time.elapsed_secs() * 10.0).sin() / 25.0,
        tailwind::YELLOW_300,
    );
}
}
Light History
Solutions for those exercises are behind the light_history feature.
History Graph
We want to draw a graph of the light status over time. The remote server exposes the get_history function to get the history of a device. Bevy doesn't have (yet) a good way to draw graphs, but it's possible to work around that by using gizmos.
Tips:
- Add events to request the history, and get the response from the server
- Add an observer system that opens a channel, and starts a task to get the history
- Add a system that will poll that channel until it receives the history, then trigger an event with it
- Draw the history with gizmos lines
✍️ Light Color
Change the light color
Let's get fancy, with colored lights!
The goal if this exercise is to play with Bevy Feathers widgets, so we'll ignore the remote server part for now.
Add to the light panel a widget to change the light color.
Tips:
- Look at https://github.com/bevyengine/bevy/blob/release-0.17.2/examples/ui/feathers.rs for inspiration
- Color of a
PointLightis defined by itscolorfield
Progress Report
What You've learned
- Displaying and placing images in 3D
- With the
Mesh3dcomponent - The
StandardMaterialasset - The
MeshMaterial3dcomponent - And the
Transformcomponent
- With the
- Loading scenes from files
- With the
AssetServerresource - And the
SceneRootcomponent
- With the
- Different lights
DirectionalLightAmbientLightPointLight- Going further: Solari,
SpotLight, light textures
- Interacting with external APIs
- Through async
Task - And channels
- Through async
- Bevy Feathers widgets
- Gizmos
Car Vision
In this section, you will learn how to:
- Find and use third party plugins for Bevy
- Use large assets
- Have multiple views showing different things
Displaying the Point Cloud
Finding Third-Party Plugins for Bevy
With its plugin architecture, Bevy is easily extendable by anyone. And with everything based on the ECS, any Bevy user can become a plugin author or an engine developer. This flexibility allows for a wide range of customization and integration options.
The Bevy community is very active to publish new plugins. You can find them:
- On the website, the Asset page
- On Discord, the #crates channel
Third-Party Plugin for Point Clouds
Bevy doesn't support rendering point clouds out of the box, but a user recently created a plugin bevy_pointcloud, with a Wasm demo.
Point Clouds
Some sample point clouds are available at https://www.limon.eu/support/sample-data.
In this workshop, we will use the KITTI dataset, made for training object detection models. It's available at https://www.cvlibs.net/datasets/kitti/raw_data.php.
If your phone has a LiDAR, you can capture a point cloud with it.
Other techniques to build a point cloud are:
- Time of flight
- Stereo vision
- Structure from motion
- Machine learning based monocular depth estimation
- Structured light
- Photogrammetry
But they are harder to setup, less accurate, or require more processing power.
First Step
Let's display a small point cloud, to check how it looks.
To use bevy_pointcloud, we need to:
- Add the
PointCloudPluginplugin - Add the
LasLoaderPluginplugin - Configure the
Camera3dto not use Indirect Drawing, and no MSAA, with theNoIndirectDrawingandMsaacomponents - Configure the
Camera3dto render point clouds, with thePointCloudRenderModecomponent - Spawn the point cloud, with the
PointCloud3dandPointCloudMaterial3dcomponents
extern crate bevy;
extern crate bevy_pointcloud;
use bevy::{prelude::*, render::view::NoIndirectDrawing};
use bevy_pointcloud::{
    PointCloudPlugin,
    loader::las::LasLoaderPlugin,
    point_cloud::PointCloud3d,
    point_cloud_material::{PointCloudMaterial, PointCloudMaterial3d},
    render::PointCloudRenderMode,
};
fn main() {
    App::new()
        .add_plugins((
            DefaultPlugins,
            PointCloudPlugin,
            LasLoaderPlugin,
        ))
        .add_systems(Startup, setup)
        .run();
}

fn setup(
    mut commands: Commands,
    asset_server: Res<AssetServer>,
    mut point_cloud_materials: ResMut<Assets<PointCloudMaterial>>,
) {
    commands.spawn((
        Camera3d::default(),
        Transform::default(),
        Camera::default(),
        NoIndirectDrawing,
        Msaa::Off,
        PointCloudRenderMode::default(),
    ));

    commands.spawn((
        PointCloud3d(asset_server.load("sample-pointclouds/lion_takanawa.copc.laz")),
        PointCloudMaterial3d(point_cloud_materials.add(PointCloudMaterial { point_size: 50.0 })),
    ));
}
The default camera is not very useful. We can either use a fly camera controller (like the one provided in Bevy examples) or a Pan/Orbit camera controller.
About KITTI
KITTI was recorded in Germany in 2011 with a car with cameras and a LiDAR:
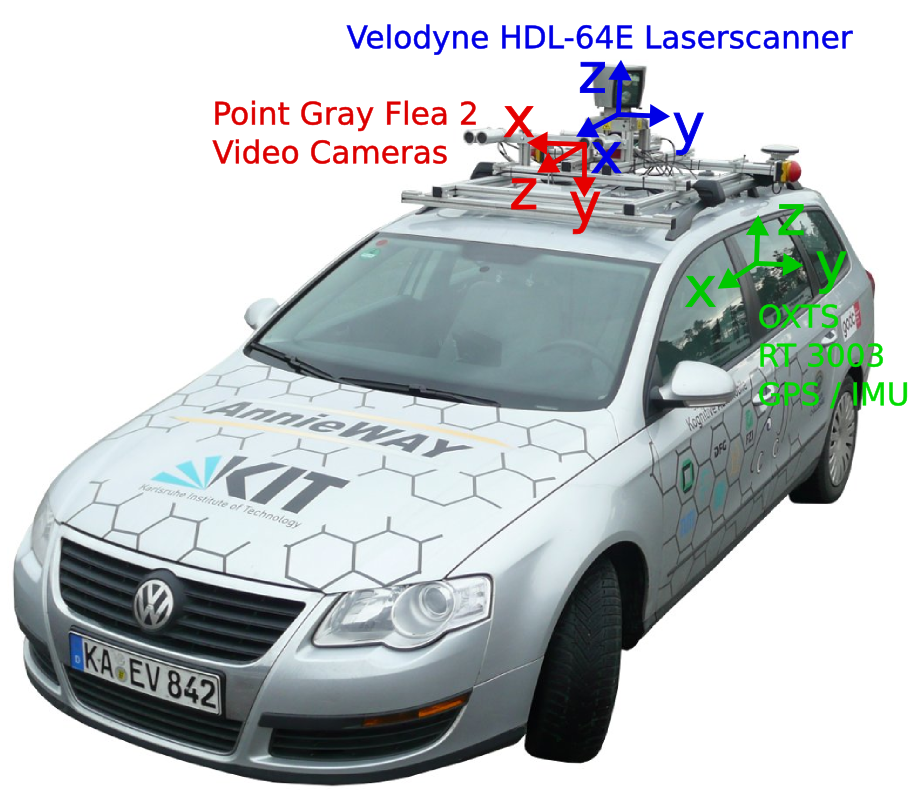
Recording are made of several frames, each with a point cloud and photos.
One recording is made available in an easy to use format in the repo, more are available at https://drive.google.com/file/d/1BDvaCX2748OcW7aPPngLRmZqTk4ms_ee/view?usp=share_link.
It doesn't have color but instead intensity, the return strength of the laser. I've converted this information to color, blue for low intensity, green for high.
It is common when rendering point clouds to be able to switch between different rendering modes:
- Point color
- Beam intensity
- Point height
bevy_pointcloud only supports color for now.
✍️ Displaying a Frame of KITTI
Displaying the Point Cloud of the First Frame
Display the first frame's point cloud using bevy_pointcloud
Tips:
- The frame is available at
kitti-2011_09_26_drive_0005_sync/velodyne/0000000000.laz - To start, a top down camera is a good idea, with a position at
(-1.0, 100.0, 0.0)looking at the origin.
Handling Large Datasets
Large Assets in Bevy
Bevy has some built-in capabilities to handle large assets, but is still limited
- Assets can be preprocessed and stored in a more efficient format
- Assets can be loaded in chunks to reduce memory usage
- Some assets can be marked as CPUonly or GPU-only with
RenderAssetUsages - Already loaded assets will be reused
- Dropping all handles to an asset will remove it from memory
With some limitations:
- Asset streaming is not yet possible
- Asset errors are hard to handle as they happen asynchronously
- Loading a file that is already loading won't reuse it
Playing an Entire KITTI Recording
Let's play an entire KITTI recording! They are made of individual point cloud files for each frame.
The sample dataset available is large enough that loading it takes some time and consumes memory, but small enough that it is possible to do and keep everything in memory.
You are free to decide of your implementation strategy:
- Load everything first, then play
- Load each frame as needed, then play, and keep it for replay
- Load each frame as needed, then play, then unload
Tips:
- You can use
AssetServer::load_folderto load every file in a folder. See this example on how to use it. - You can keep the asset
Handles already loaded in a resource - You should check that a pointcloud is finished loading before displaying it to avoid blinking with
AssetServer::get_load_state - The files are available at
format!("kitti-2011_09_26_drive_0005_sync/velodyne/{:0>10}.laz", current_frame))
Multiple Views
Limiting the Camera to Half the Window
Restricting a camera to part of a window can be done by setting its viewport. To know the correct size, we will need the Window.
#![allow(unused)]
fn main() {
extern crate bevy;
extern crate bevy_pointcloud;
use bevy::{camera::Viewport, prelude::*, render::view::NoIndirectDrawing};
use bevy_pointcloud::{
    PointCloudPlugin,
    loader::las::LasLoaderPlugin,
    point_cloud::PointCloud3d,
    point_cloud_material::{PointCloudMaterial, PointCloudMaterial3d},
    render::PointCloudRenderMode,
};
fn setup(
    mut commands: Commands,
    asset_server: Res<AssetServer>,
    mut point_cloud_materials: ResMut<Assets<PointCloudMaterial>>,
    window: Single<&Window>,
) {
    commands.spawn((
        Camera3d::default(),
        Transform::default(),
        Camera {
            viewport: Some(Viewport {
                physical_position: uvec2(0, 0),
                physical_size: uvec2(window.physical_width() / 2, window.physical_height()),
                ..default()
            }),
            ..default()
        },
        NoIndirectDrawing,
        Msaa::Off,
        PointCloudRenderMode::default(),
        Transform::from_translation(Vec3::new(-1.0, 100.0, 0.0)).looking_at(Vec3::ZERO, Vec3::Y),
    ));
}
}
Setting the viewport size and position at Startup won't update it if the window is resized.
For that, you will need a system that reads the WindowResized message, and query the Window component to get its physical size, and updating the camera viewport.
Adding Another Camera
When spawning multiple cameras, it's important to set different value for their order field. Bevy will warn you that rendering can be random if that's not the case.
In our application, each camera will have its own viewport, so there's no ordering ambiguity, but it doesn't hurt to play nice with Bevy.
#![allow(unused)]
fn main() {
extern crate bevy;
extern crate bevy_pointcloud;
use bevy::{camera::Viewport, prelude::*, render::view::NoIndirectDrawing};
use bevy_pointcloud::{
    PointCloudPlugin,
    loader::las::LasLoaderPlugin,
    point_cloud::PointCloud3d,
    point_cloud_material::{PointCloudMaterial, PointCloudMaterial3d},
    render::PointCloudRenderMode,
};
fn setup(
    mut commands: Commands,
    asset_server: Res<AssetServer>,
    mut point_cloud_materials: ResMut<Assets<PointCloudMaterial>>,
    window: Single<&Window>,
) {
    // Left side of the window
    commands.spawn((
        Camera3d::default(),
        Transform::default(),
        Camera {
            order: 0,
            viewport: Some(Viewport {
                physical_position: uvec2(0, 0),
                physical_size: uvec2(window.physical_width() / 2, window.physical_height()),
                ..default()
            }),
            ..default()
        },
        NoIndirectDrawing,
        Msaa::Off,
        PointCloudRenderMode::default(),
        Transform::from_xyz(-1.0, 100.0, 0.0).looking_at(Vec3::ZERO, Vec3::Y),
    ));

    // right side of the window
    commands.spawn((
        Camera3d::default(),
        Transform::default(),
        Camera {
            order: 1,
            viewport: Some(Viewport {
                physical_position: uvec2(window.physical_width() / 2, 0),
                physical_size: uvec2(window.physical_width() / 2, window.physical_height()),
                ..default()
            }),
            ..default()
        },
        NoIndirectDrawing,
        Msaa::Off,
        PointCloudRenderMode::default(),
        Transform::from_xyz(-1.0, 0.25, 0.0).looking_at(Vec3::ZERO, Vec3::Y),
    ));
}
}
Displaying Different Things to Each Camera
If you want to display different things to each camera, you can use the RenderLayers component. By default, everything is on layer 0. Render layers work as a mask, and a camera will render entities that are on a layer that matches its own.
This can be used to create split screen effects, or in our case to render the point cloud with different point size as the first person view is better with a smaller point size that the top down view.
Car Camera
Display the Car Camera View
With the recording, we also have color photos of the car view. We can use these photos to help understand the point cloud. Let's add a new camera to the window, this time displaying the photos.
Tips:
- Restrict the first person view of the point cloud to a quarter of the window
- Add a 2D camera to the remaining quarter
- Display the png with the same name as the currently displayed point cloud
Controls
Setting Up egui
We want to be able to control the playback of the point cloud data. By pausing or by manually selecting a frame to display.
We will use egui for this application as it has a rich widget library and is easy to use.
It has a plugin for Bevy, bevy_egui. We can add the EguiPlugin to our app.
As we have multiple cameras, we need to help egui know to which camera it should render to. We will need to set the auto_create_primary_context field to false on the EguiGlobalSettings resource, and add the PrimaryEguiContext component to the camera we choose.
Rendering the UI
bevy_egui is rendering in immediate mode. We will need a system in the EguiPrimaryContextPass schedule to draw the UI.
#![allow(unused)]
fn main() {
extern crate bevy;
extern crate bevy_ecs;
extern crate bevy_egui;
use bevy::{
    camera::{Viewport, visibility::RenderLayers},
    prelude::*,
    render::view::NoIndirectDrawing,
    window::WindowResized,
};
use bevy_egui::{
    EguiContexts, EguiGlobalSettings, EguiPlugin, EguiPrimaryContextPass, PrimaryEguiContext, egui,
};
#[derive(Resource)]
struct Play {
    current_frame: u32,
    frame_count: u32,
    playing: bool,
}

fn controls(
    mut contexts: EguiContexts,
    mut play: ResMut<Play>,
) -> Result {
    egui::TopBottomPanel::top("Controls").show(contexts.ctx_mut()?, |ui| {
        ui.horizontal(|ui| {
            let frame_count = play.frame_count;
            ui.add(egui::Slider::new(&mut play.current_frame, 0..=frame_count).text("Frame"));
            if ui
                .button(if play.playing { "Pause" } else { "Play" })
                .clicked()
            {
                play.playing = !play.playing;
            }
        });
    });
    Ok(())
}
}
Progress Report
What You've learned
- Searching for third party plugins
- Handling large assets
- With
RenderAssetUsagesto control where the asset is stored - The importance of controlling the lifecycle of assets through their
Handle - Loading a folder with
AssetServer::load_folder - Checking an asset status with
AssetServer::get_load_state
- With
- Displaying multiple cameras
- Setting their viewport
- Setting their order
- Using
RenderLayerscomponent